 |
Two Gents in Their Caps
Image Source Unknown |
In the living history field these days, there seem to be a lot of discussion as to the appropriate terminology for some objects. Since there is no agreed apon, central data-base for all of us to dip into, the choice of terms is left to the more or less discriminating among us. As an example, let's take men's mid-19th Century caps. For years the living history community has called them Wheel Caps or Mechanic's Caps and for better or for worse, both names have become firmly fixed into the common language of the hobby.
In my research, I've seen Gold Rush California newspaper ads for "Fremont Caps" and two reprinted 1850's Rubber Goods Catalogs list "Kit Carson Caps". As a westerner I would love to start using those iconic names to describe a cap but it would probably lead to more confusion. For the sake of simplicity I just like to call them "Caps".
 |
From Plate #19, "Workwoman's Guide"
Fig. 53 shows finished cap,
Fig. 54 shows pieces you will need for the body outside
and a brim |
 |
A Gentleman in His Cap With Its Glazed Cover
Image Source Unknown |
What I like about men's caps is that they are relatively easy and fun to recreate. As long as you follow the historic model, you can make a fairly authentic version. There appears to be a lack of surviving examples from this period except for a handful of rare military versions, so what we are left with is the photographic record and a period pattern.
 |
A Great Example of a Cloth Covered Brim
Image Source Unknown |
The original pattern I've included here is the one found in "The Workwoman's Guide" of 1838. This book is available in reprint and is an incredible resource that I highly recommend. The description of the cap is on page 156 and reads, "This is a remarkably neat cap, and may be worn by either a boy or a man; it is generally made of cloth." The description continues with instructions on how to make the cap. All of the measurements in this guide are in "nails" which is 2 1/4" and it's best if you make up a ruler in those increments if you are going to follow this historic pattern.
 |
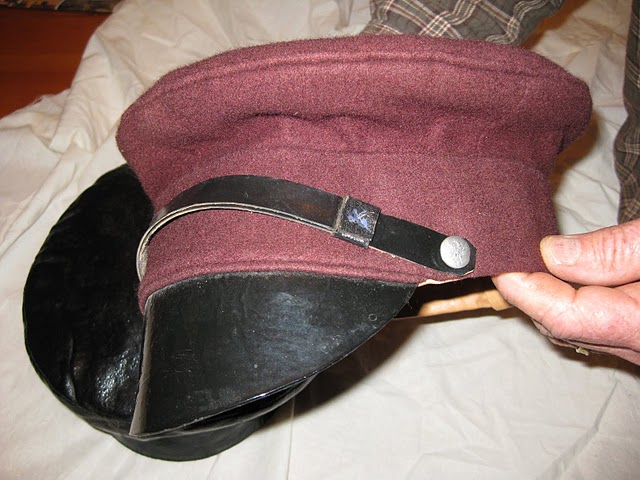
My Cap With its Glazed Cover
Photos Lindy Miller 2011 |
 |
| Same Cap Without its Cover |
 |
Cap Showing Lining and Sweatband
Glazed Cover to the Left |
From my experience, it's best to make up a sample in a lesser fabric, to test the pattern. You will need a round piece for the top and four curved pieces which join together at the ends, for the underside. Eventually the top and underside are sewn together with a welted seam. I like to start with the band piece. The band piece is sized to fit your head, allowing for seam allowances, buckram band stiffner, hat lining and sweatband. The shorter (curved side) of each of the 4 underpieces should be approximately 1/4 the length of the band piece plus seam allowances. Are you with me so far? The longer (curved) side of each of the 4 underpieces will be 1/4 of the circumference of the circle. There's some wiggle room here as the curved underpieces will have a little bias. Sew the joined band piece to the assembled top and you have the basic hat. Next comes the brim and a nice touch here is to sew it to the inside of the band piece with a welted seam (see the photo). I usually use leather for the brim but many caps appear to have cloth covered ones that match the body. At this point you could install the buckram stiffner to the inside of the band piece. Next, create a lining, using the same pattern as the body but smaller and attach it to the inside. Last would be the chin strap and sweatband.
It is not my intention for this post to be a working pattern for a cap but rather a set of suggestions based on caps that I have made. This can be a simple or complicated project and I hope I haven't contributed to the latter. If you wish to make a glazed cover for your cap, a slight enlargement of the pattern, in a nice heavy muslin will work. You can then paint it black with an oil-based enamel. I found that stuffing the cover with rags before you paint it (several coats) will help keep its shape as it dries. Good Luck and keep reminding yourself that this is a fun one. You will look right smart in your new cap.....Really !!
As a post script, I've added some pictures that were recently sent to me by my old friend Will Dunniway. These are of one of my first caps, made about 15 years ago and traded to Will for some collodion work. The cap's wear celebrates its many years of service and has given it a comfortable look you can't fake. I like the nifty label too.


I like the little tag you put in the green cap. I made a cap like this several months ago. How did you attach the brim? And the sweatband behind the brim, how is that attached? Is there anywhere I can see more detail on making a cap like this?
ReplyDeleteHey Cacey,
DeleteThanks for your interest. I punched holes about 1/4" apart along the inside edge of the brim, then stitched it onto the inside of the band. The welt hides the stitches. The sweatband is sewn inside out around the band and through the punched holes and then turned in. Hope that helps.
ware did you get it
ReplyDeleteDirty Billy Hats(in Gettysburg) sells a straw version, do you have any information showing that this was done? I can't find any mention or resources saying so.
ReplyDeleteThanks!